
How to Create a Content Calendar in BloomDraft
Publishing blog posts whenever they're ready creates gaps. You go silent for two weeks, then flood your readers with five articles in three days. A content calendar fixes this by spacing out your content and giving you a bird's-eye view of what's scheduled.
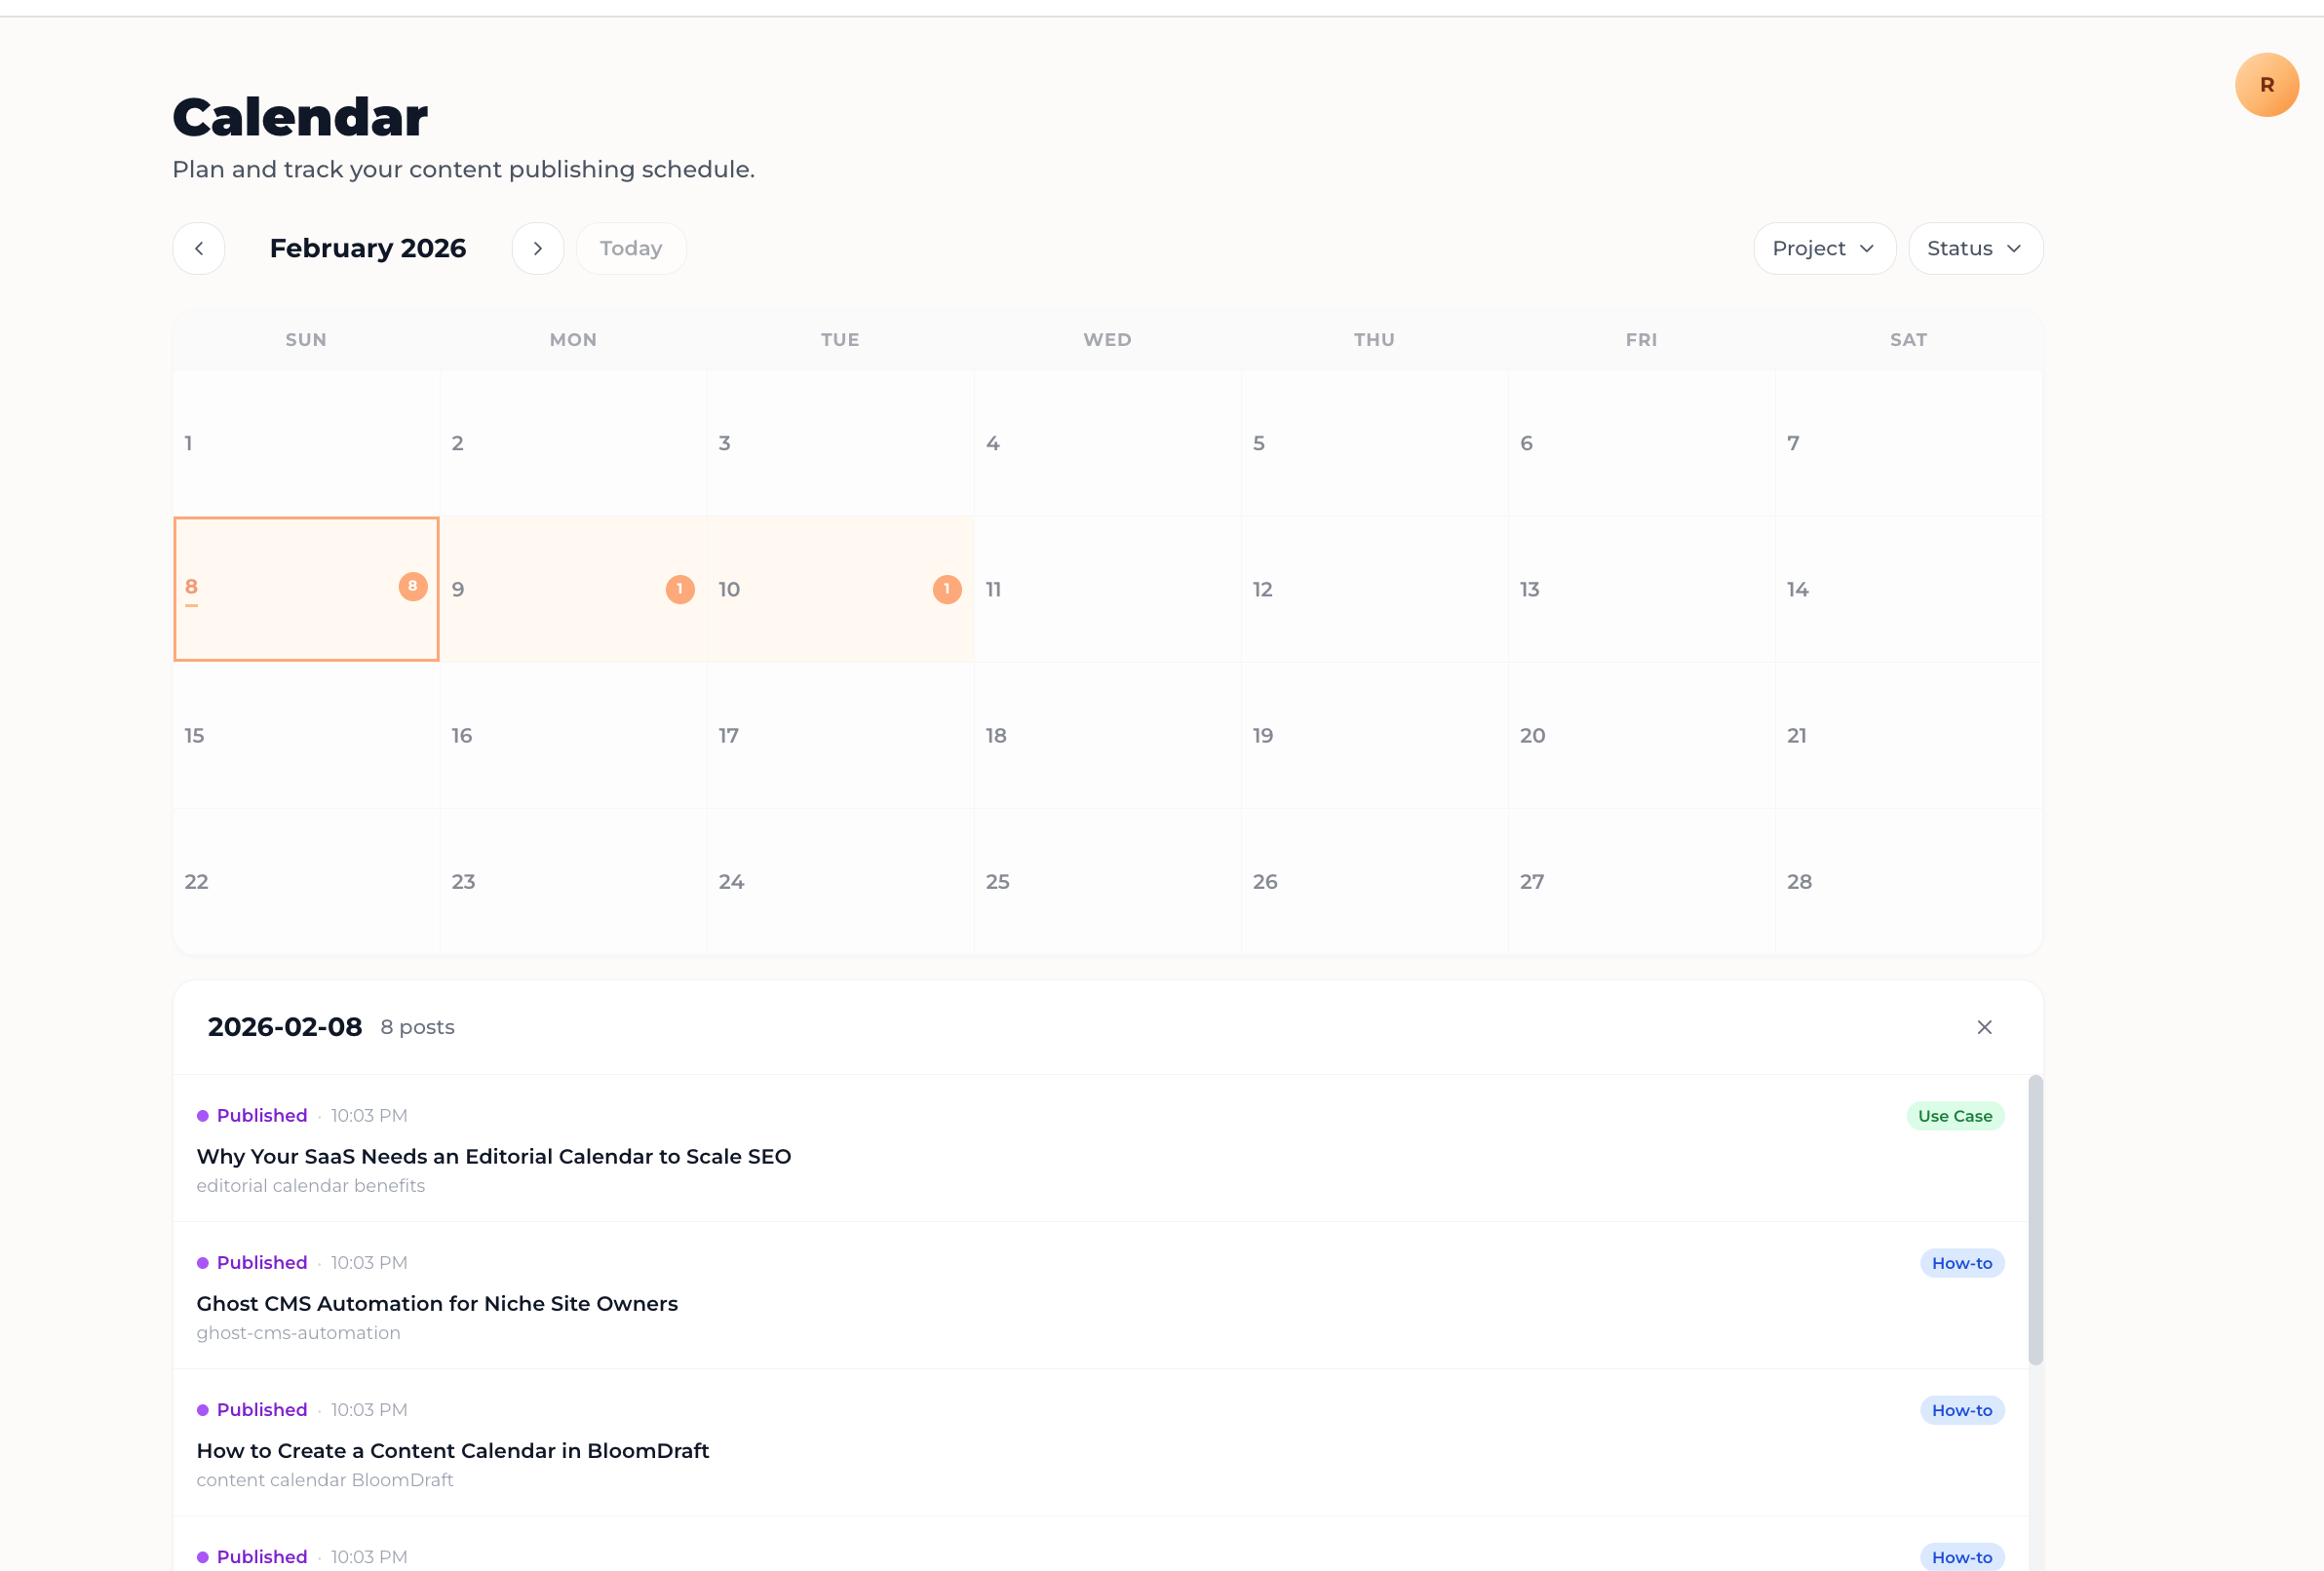
BloomDraft's content calendar shows all your posts organized by their scheduled or published dates. You can filter by project, jump between months, and see exactly what's going live on any given day. This guide walks you through setting it up and using it to manage your publishing schedule.
What You'll Need Before Starting
Before you open the calendar view, make sure you have:
- At least one project created in BloomDraft with your product context
- A few blog posts generated (either through topic clusters or standalone creation)
- Publishing integration configured if you want to auto-publish (WordPress, Ghost, or Custom API)
The calendar works whether you're managing a single blog or juggling content across multiple projects. Posts appear on the calendar once they have a scheduled date or have been published.
Step 1: Generate Your Content First
The calendar organizes content you've already created. If you're starting from scratch, generate a few posts before scheduling them.
Use BloomDraft's Topics feature to create a cluster of related articles. Enter 1-3 seed keywords relevant to your product, and the AI generates 10-15 blog ideas with titles, keywords, and article types. Select the ones you want, and BloomDraft drafts the full posts.
Alternatively, use the Write feature for standalone posts. Choose "From an Idea" if you have a specific topic, or "Optimize a Draft" if you're improving existing content. Pick your writing style (Tutorial, Opinion, Deep Dive, etc.) and length, then let the AI build the article.
Once your posts reach "ready" status in the blog management table, you can schedule them.
Step 2: Access the Content Calendar
Navigate to the calendar view from your BloomDraft dashboard. The interface displays a monthly grid with days of the week across the top and dates filling the cells.
You'll see a "Today" button that jumps you back to the current date, plus arrows to move between months. This matters when you're planning content weeks or months ahead and need to quickly return to what's publishing soon.
The calendar defaults to showing all projects. If you manage multiple blogs, you'll see posts from each one labeled with their project name.
Step 3: Schedule Individual Posts
Open your blog management table (the main list of all your posts). Find a post with "ready" status and click into it to open the editor.
In the editor's publishing panel, you'll see scheduling options. Set a specific date and time for when you want the post to go live. BloomDraft changes the post status to "scheduled" and adds it to your calendar.
The post now appears on the calendar on its scheduled date. When that date arrives, BloomDraft automatically publishes it to your connected platform (WordPress, Ghost, or Custom API).
For posts you've already published manually, the calendar shows them on their published date. This gives you a historical view of your content output.
Step 4: Filter by Project and Status
If you're running multiple blogs, the calendar can get crowded. Use the project filter at the top to show only posts from a specific project.
The status filter lets you narrow the view to:
- Scheduled — posts waiting to publish on a future date
- Publishing — posts currently being pushed to your platform
- Published — posts that have already gone live
Filtering by "scheduled" shows your upcoming pipeline. Filtering by "published" shows your historical output. This helps you spot patterns—like realizing you publish nothing on weekends or that you front-load content at the start of each month.
Step 5: Review Daily Post Details
Click any day on the calendar to open a detail panel. On desktop, this appears as a sidebar on the right. On mobile, it slides up as a sheet.
The panel lists every post scheduled or published on that day, showing:
- Post title
- Project name (if you have multiple)
- Current status
- Scheduled or published time
This view helps when you're deciding whether to add another post to a specific day or when you need to quickly check what's going out without opening each post individually.
If you see too many posts clustered on one day, you can reschedule them by opening the post editor and changing the date.
Step 6: Plan Content Distribution
A content calendar only works if you use it to make distribution decisions. Look at your calendar weekly and ask:
- Are there multi-day gaps where nothing publishes?
- Are multiple posts scheduled for the same day when they could be spread out?
- Do you have enough scheduled content to cover the next two weeks?
If you spot gaps, generate more content or move scheduled posts to fill them. If you see clusters, redistribute posts to create consistent publishing frequency.
BloomDraft's calendar gives you cross-project visibility, so if you're managing a product blog and a personal blog, you can coordinate publishing to avoid competing with yourself for attention.
Step 7: Bulk Schedule for Consistency
Once you've generated a batch of posts through a topic cluster, schedule them all at once instead of publishing immediately. This creates a content buffer.
Decide on a publishing frequency—say, two posts per week on Tuesday and Thursday. Open each post in the batch, set the scheduled date, and space them out across the next month.
Now your calendar shows a consistent pattern. You've decoupled content creation from publishing, which means you can write in batches but maintain a steady output.
If something urgent comes up and you need to publish off-schedule, you can still do that. The calendar accommodates both planned and reactive publishing.
Troubleshooting Common Calendar Issues
Post isn't appearing on the calendar
Check the post status. Only posts marked as "scheduled," "publishing," or "published" show up. If the post is still "generating" or "ready," it won't appear until you schedule it.
Calendar shows the wrong date
Verify the timezone settings in your project configuration. If your BloomDraft timezone doesn't match your publishing platform's timezone, posts may appear on the wrong day.
Can't see posts from a specific project
Check the project filter at the top of the calendar. If it's set to a different project, posts from other projects won't display. Set it to "All Projects" to see everything.
Scheduled post didn't publish
Confirm your publishing integration is still connected. Go to your project settings and check that your WordPress, Ghost, or Custom API credentials are valid. If the connection broke, BloomDraft can't push the post.
What Happens After Scheduling
Once a post is scheduled, BloomDraft monitors the clock. When the scheduled time arrives, the platform automatically publishes the post to your connected blog.
The post status changes from "scheduled" to "publishing" (brief) to "published." On the calendar, it remains on the same date but updates its status indicator.
You don't need to be logged in or manually trigger anything. The calendar becomes a set-it-and-forget-it system for maintaining publishing consistency.
If you need to change a scheduled post before it publishes, open the editor and modify the date or content. The calendar updates immediately.
Using the Calendar for Content Strategy
Beyond scheduling, the calendar helps you see patterns in your content output. Look at a full month and notice:
- Which article types you're publishing most (Pillar, How-to, Use Case, Tool Comparison)
- Whether you're covering all your core topics or fixating on one
- How publishing frequency correlates with traffic spikes (if you're tracking analytics)
If you notice you've published five "How-to" posts in a row, balance it with a Pillar post or a Tool Comparison. If you see gaps around holidays or busy periods, schedule content in advance to cover them.
The calendar turns reactive publishing into strategic planning. You stop asking "What should I publish today?" and start asking "What does my content mix look like this month?"
Next Steps
You now have a functioning content calendar that schedules posts, tracks publishing dates, and organizes content across projects. Use it to build a content buffer, maintain consistent output, and plan your editorial strategy weeks in advance.
If you haven't connected a publishing integration yet, set up WordPress, Ghost, or a Custom API so scheduled posts publish automatically. If you're managing multiple blogs, use the project filter to review each one's calendar individually, then switch to the combined view to spot conflicts or gaps.
The calendar doesn't create content—it organizes it. Keep generating posts through topic clusters or standalone creation, then slot them into your schedule. The more content you have ready, the easier it becomes to maintain a consistent publishing rhythm.