How to Use BloomDraft's Content Calendar to Schedule and Organize Your Blog Posts
You’ve got drafts sitting in BloomDraft—some for your main product blog, some for a side project—and the only thing stopping you from publishing smoothly is scheduling. BloomDraft’s content calendar is where those posts become an actual plan: what’s going out, when, and for which project.
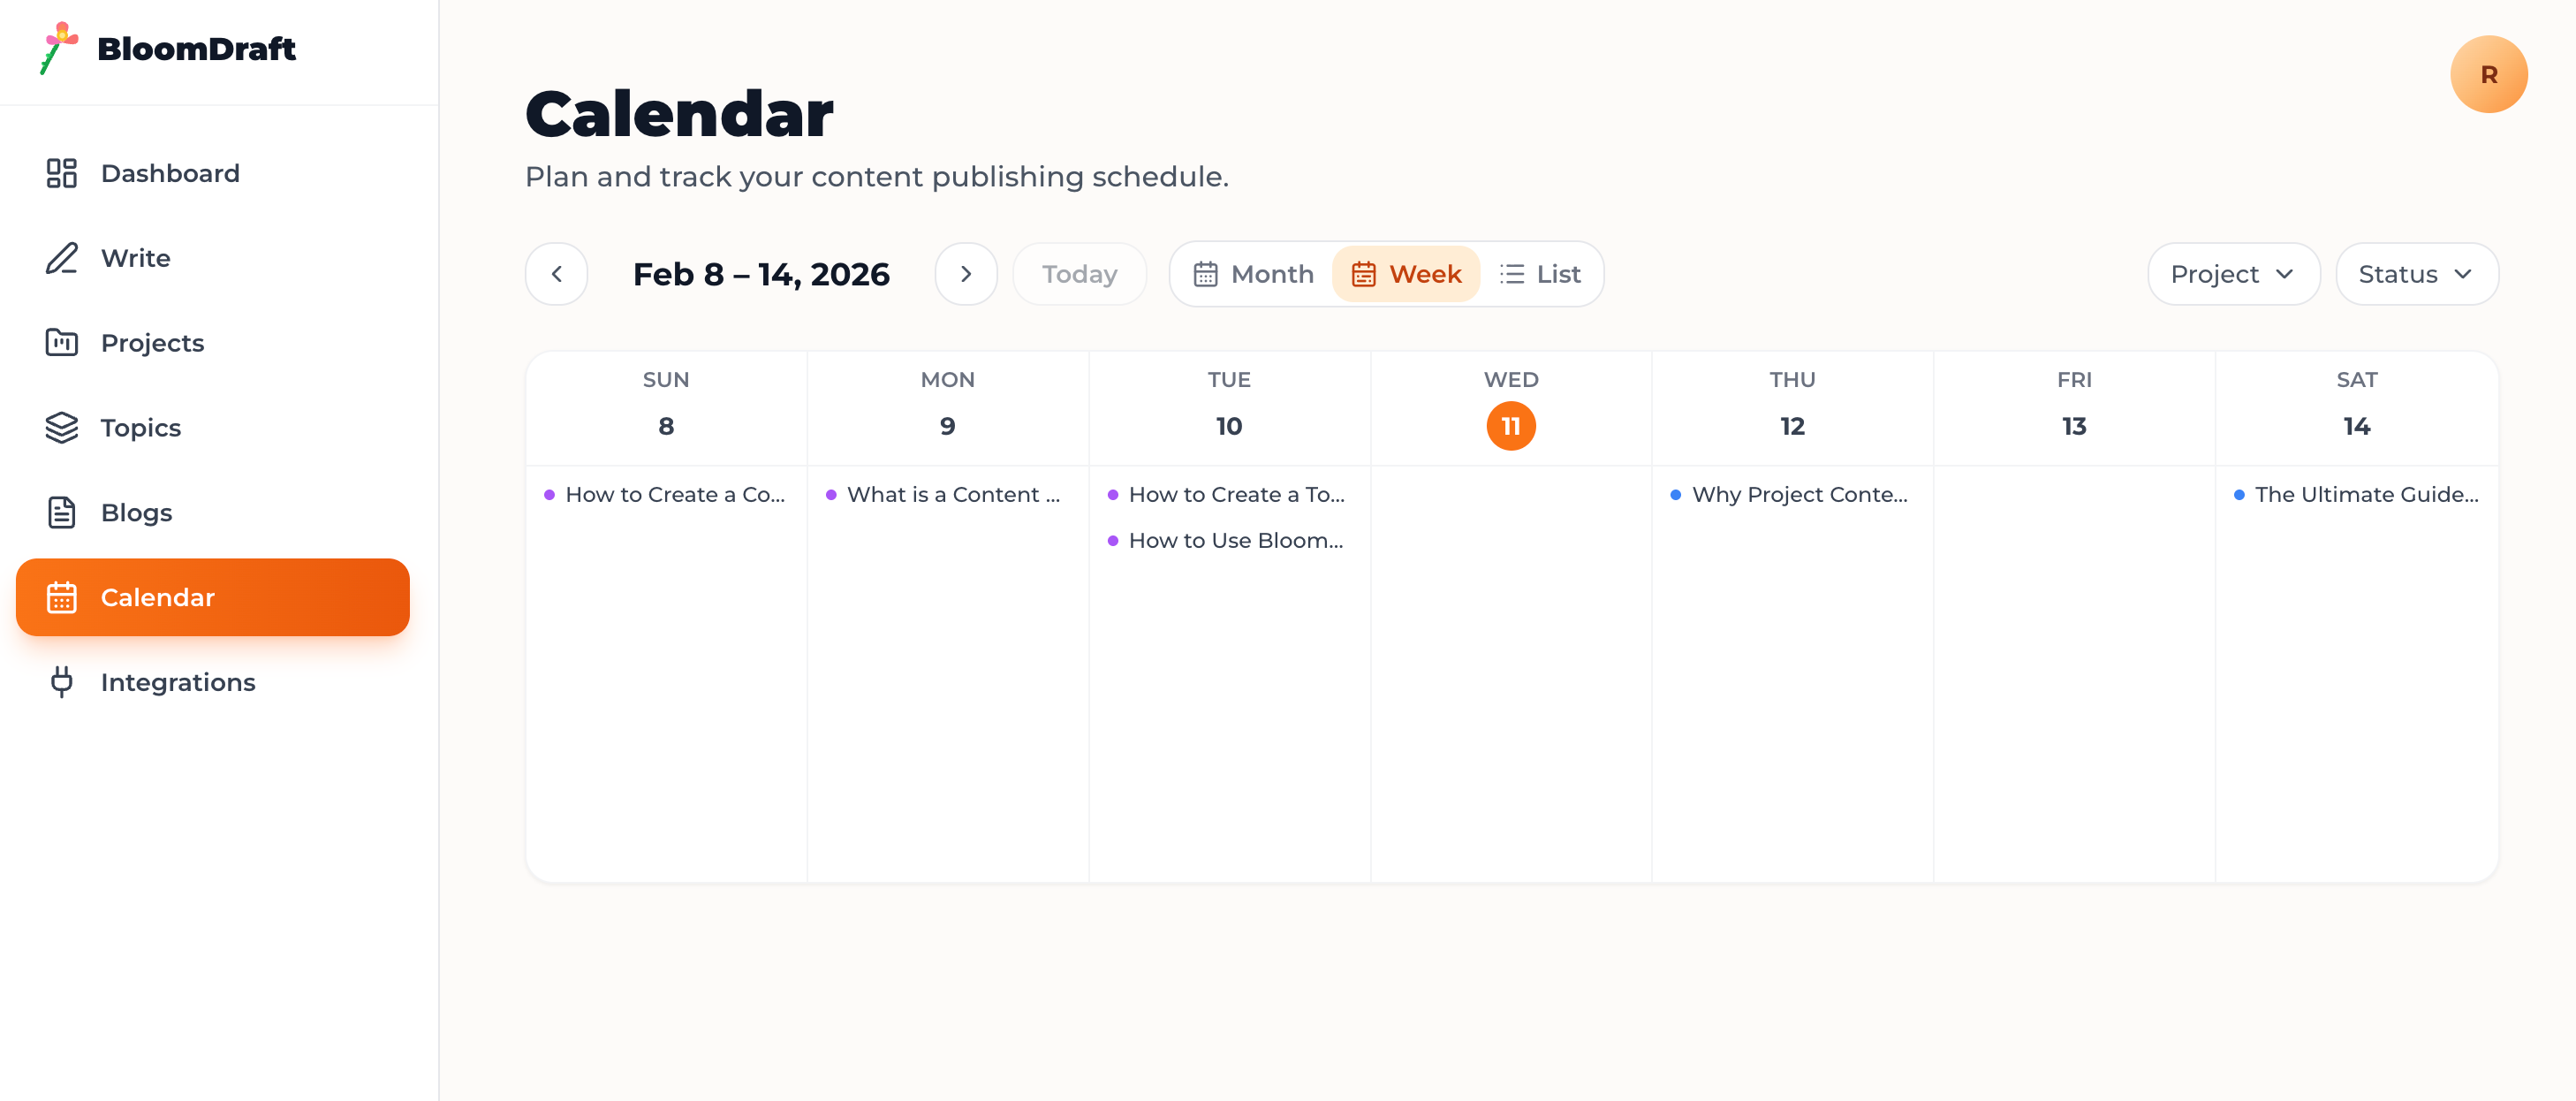
Below is the hands-on flow: open the calendar, schedule posts, use filters to keep it readable, and review a day’s lineup without digging through the post table.
What you’ll need before you start
You don’t need a complicated setup, but a few things have to be true for the calendar to be useful.
- At least one project in BloomDraft
- Posts in “Ready” (or equivalent) status so they can be scheduled
- A publishing integration (WordPress, Ghost, or Custom API) if you want BloomDraft to publish automatically
Note: the calendar only shows posts that have a scheduled date or are already published. “Generating” or “Ready” items won’t appear until you assign a time.
Open the content calendar
- From your BloomDraft dashboard, open the left navigation.
- Click Calendar (sometimes labeled Content Calendar).
- Use the ← / → arrows to move between months.
- Click Today to jump back to the current week.
By default, the calendar shows posts across all projects. If you manage multiple blogs, this is useful for spotting collisions (two big announcements on the same day) before they happen.
Schedule an individual post
Scheduling happens from the post itself, not by dragging items around the calendar.
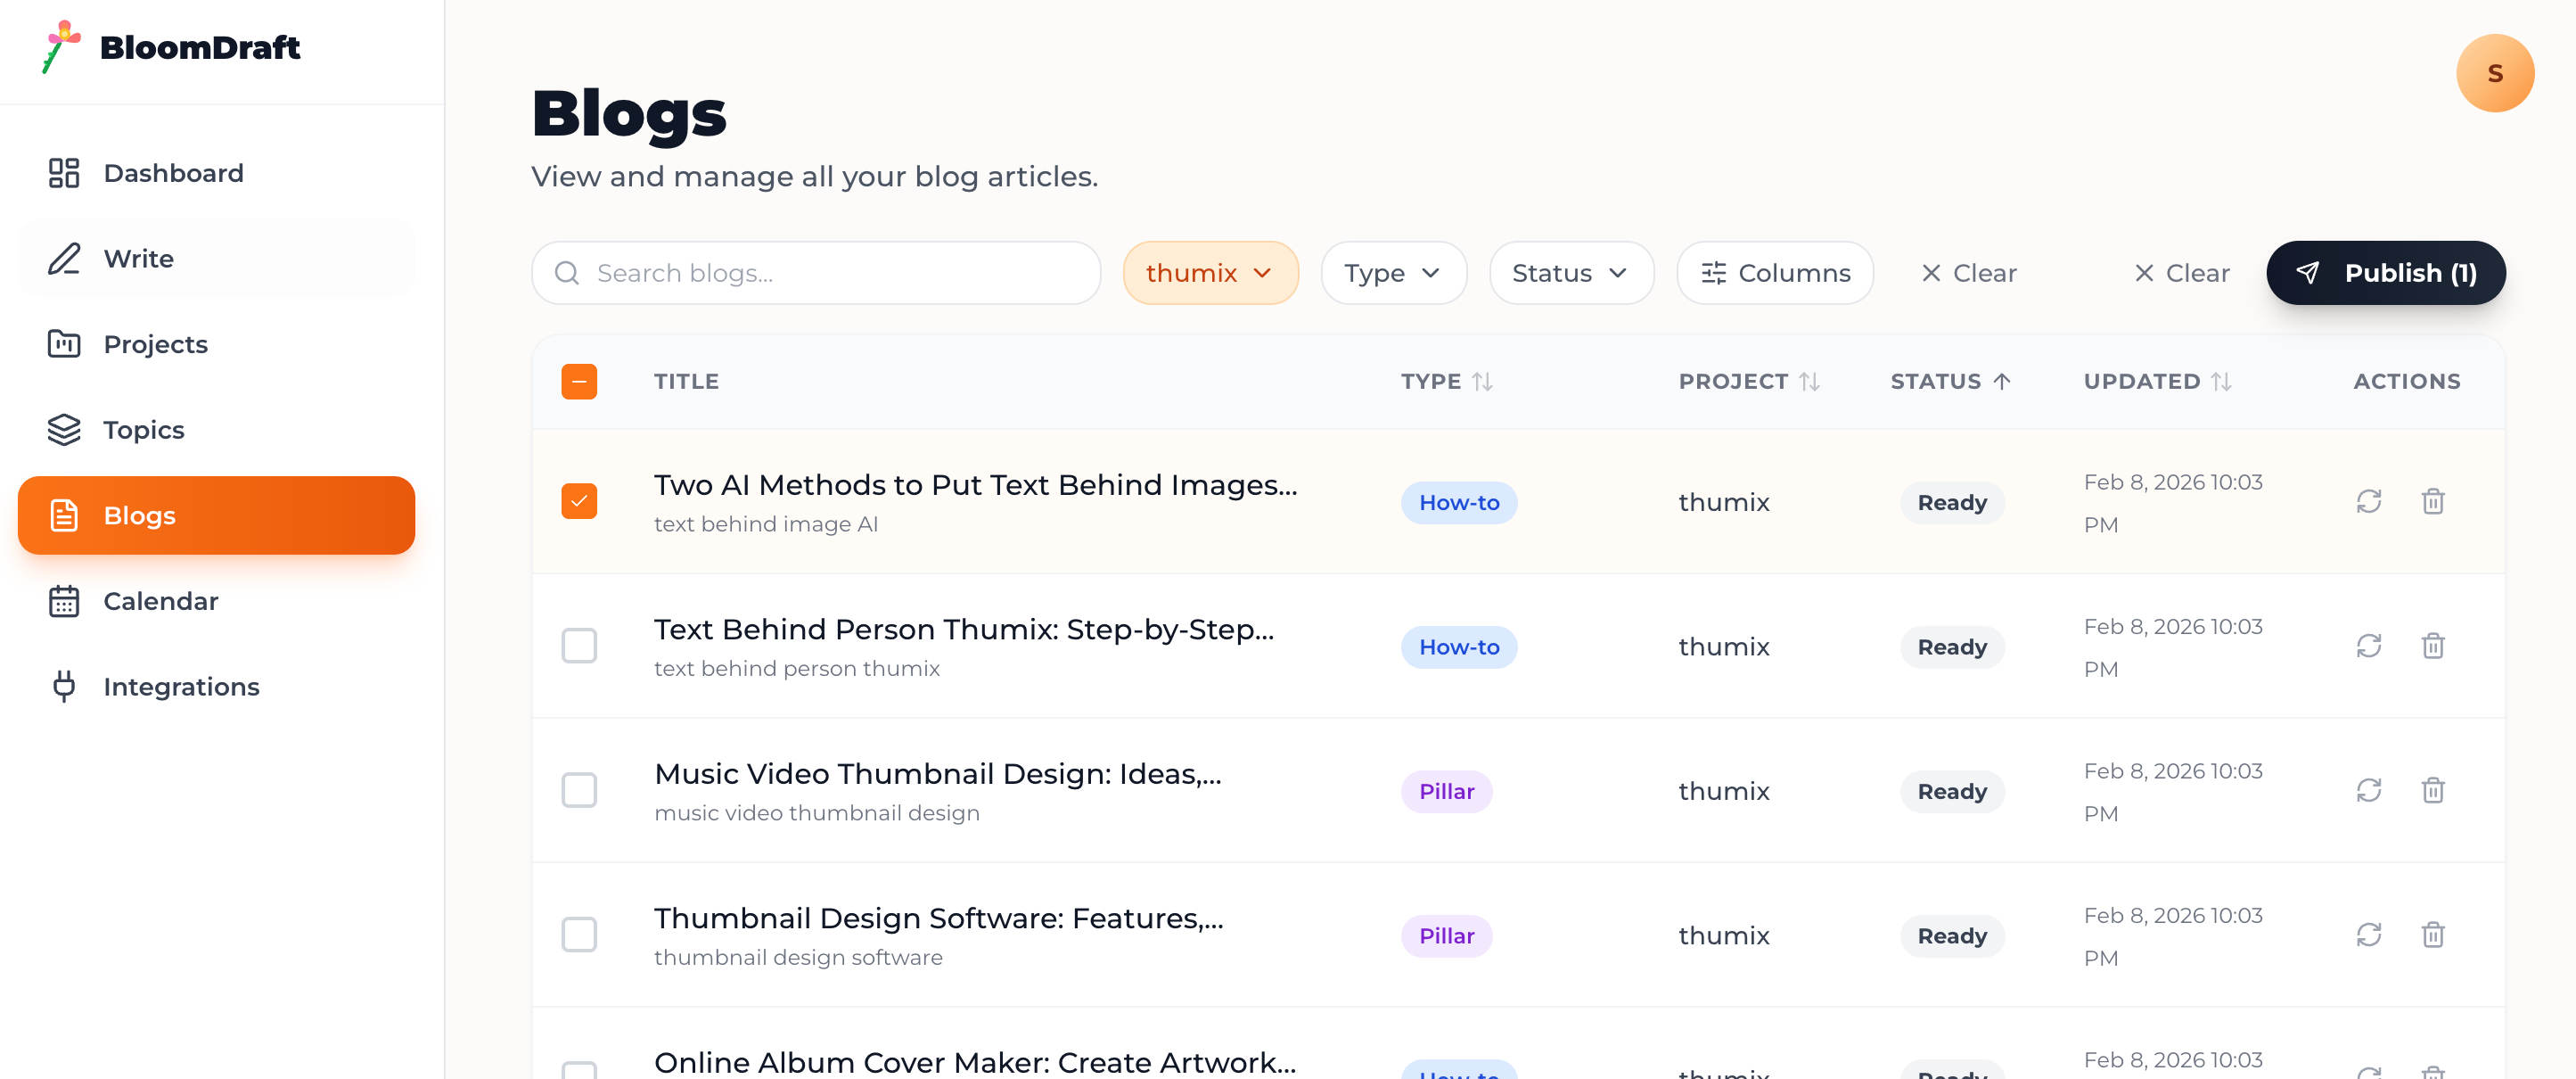
- Open Blogs (your blog management table).
- Check a post with Ready status.
- Click Publish button.
- Choose your integration(destination) and setup the schedule time.
- Save.
Once saved, BloomDraft updates the post to Scheduled and it appears on the content calendar on that date.
Common adjustments
- To reschedule, change the date/time in the same panel and save again.
- To publish manually, leave scheduling off and publish from your platform; BloomDraft will still show it as Published (on its published date) once synced.
Filter the calendar by project and status
When the calendar starts filling up, filters are what keep it usable.
- At the top of the calendar, open the Project dropdown.
- Select All Projects or a specific project.
- Open the Status filter and select what you want to see.
Typical status options:
- Scheduled — queued for a future publish time
- Publishing — currently being pushed to your platform
- Published — already live
If you’re trying to answer “What’s going out next week?”, filter to Scheduled and switch to the next month/week. If you’re auditing output, filter to Published.
Review what’s scheduled on a specific day
Clicking into a day is the fastest way to sanity-check a busy week.
- Click any day cell on the calendar.
- A detail panel opens (right sidebar on desktop, slide-up panel on mobile).
You’ll see a list of posts for that day, typically including:
- Title
- Project
- Status
- Scheduled/published time
If a day looks overloaded, don’t guess. Open the specific post from the list, change its scheduled time, and save.
Plan distribution (and batch-schedule without the repetition)
This is the part most people skip: using the content calendar to make scheduling decisions, not just to “store dates.”
A simple weekly routine works:
- Look 2–4 weeks ahead in the calendar.
- Fill gaps first (empty weeks are where consistency breaks).
- Break up clusters (3 posts on one day usually means 2 of them won’t get attention).
A concrete example: a two-post weekly cadence
Say you want two posts per week for one project.
- Schedule Tuesdays at 10:00
- Schedule Thursdays at 10:00
If you have eight ready posts, that’s four weeks of coverage. Your calendar will show a clean pattern immediately, and you’ll know exactly when you need the next batch.
How to batch-schedule in BloomDraft
BloomDraft doesn’t (typically) bulk-assign dates from the calendar itself, so the “bulk” part is a quick repeatable workflow:
- In Posts, filter to Status: Ready (and optionally select a Project).
- Open the first post, set the publish date/time, Save.
- Use your next post/previous post navigation (or return to the table) and repeat.
- Jump back to the content calendar to confirm spacing.
This keeps creation and publishing separate: you can write in bursts, then publish on a predictable cadence.
What happens after you schedule
At the scheduled time, BloomDraft attempts to publish through your connected integration.
Status typically moves:
- Scheduled → 2. Publishing (brief) → 3. Published
If you edit the post before it goes live—copy, title, metadata, the scheduled time—just save. The calendar updates right away.
Troubleshooting common calendar issues
A post isn’t appearing on the calendar
- Confirm it has a scheduled date or is published.
- Check status: items stuck in Generating or still Ready won’t show until scheduled.
The calendar shows the “wrong” date
- Check the timezone in your BloomDraft project settings.
- Match it to your publishing platform’s timezone (WordPress/Ghost). A mismatch is the usual reason a post lands on the previous/next day.
You can’t see posts from a specific project
- Set Project → All Projects to verify they exist.
- Then re-select the project you want; it’s easy to leave a filter on without noticing.
A scheduled post didn’t publish
- Go to Project settings → Integrations.
- Re-check credentials/API keys and connection status for WordPress, Ghost, or your Custom API.
- If the integration was disconnected, BloomDraft can’t push the post (even if the calendar date arrives).
Next actions (only the ones that move things forward)
- If you want hands-off publishing, connect (or re-check) WordPress/Ghost/Custom API in your project settings.
- Pick a cadence you can sustain (e.g., Tue/Thu at 10:00), then schedule the next 2–4 weeks so the calendar is always “ahead.”
- Make a habit of one quick calendar review each week: scan for gaps, then reschedule before they become missed weeks.